logo
logo


The Firewall section of WP Captcha is dedicated to fortifying the security of your WordPress site. It consists of three sub-sections: General, 2FA (Two-Factor Authentication), and Cloud Protection. WP Captcha’s Firewall section provides comprehensive protection against a wide array of threats and vulnerabilities. By carefully configuring the General, 2FA, and Cloud Protection settings, you can significantly enhance the security of your WordPress website.
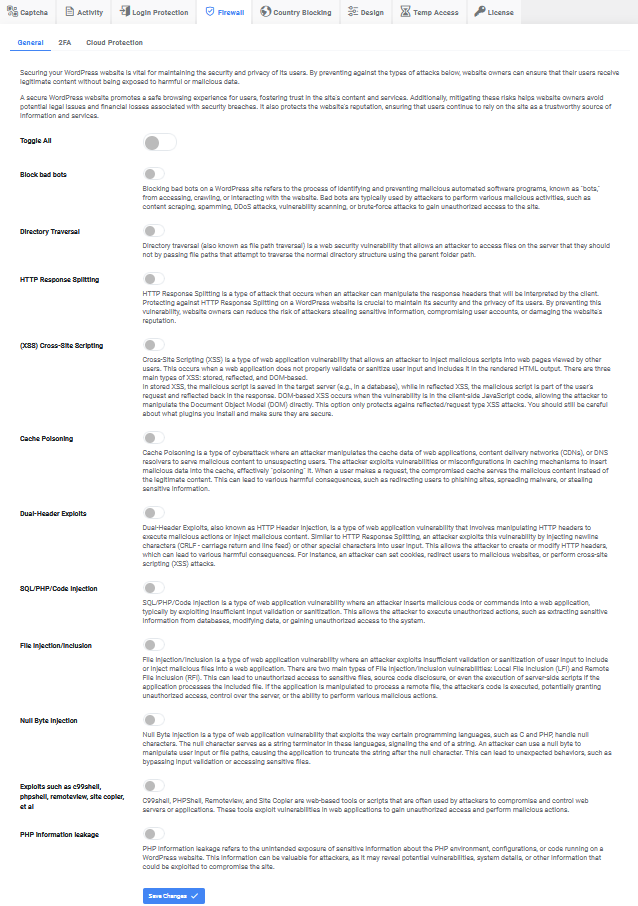
General Firewall Settings
Here’s a comprehensive guide to help you understand and configure these settings. This section offers a wide array of protections against common vulnerabilities and threats:
How to Configure:
- Toggle All: Enable or disable all protections with one click.
- Block Bad Bots: Prevent malicious automated software programs from accessing your site.
- Directory Traversal: Protect against unauthorized access to files on the server.
- HTTP Response Splitting: Secure user privacy by guarding against response header manipulation.
- Cross-Site Scripting (XSS): Safeguard against the injection of malicious scripts.
- Cache Poisoning: Prevent manipulation of cache data to serve malicious content.
- Dual-Header Exploits: Block HTTP header injection to execute malicious actions.
- SQL/PHP/Code Injection: Guard against unauthorized code or command insertion.
- File Injection/Inclusion: Protect against unauthorized access to sensitive files or scripts.
- Null Byte Injection: Secure against manipulation of user input or file paths.
- Exploits such as c99shell, phpshell, remoteview, etc.: Defend against web-based tools used by attackers.
- PHP Information Leakage: Protect against unintended exposure of sensitive PHP information.
- Click “Save Changes”: Confirm your selections to apply the settings.
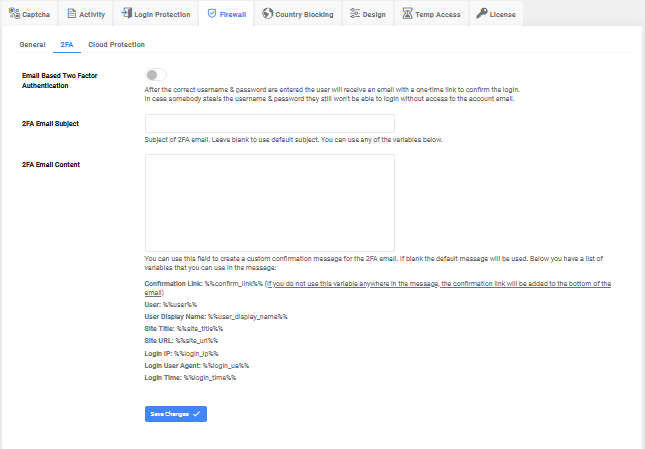
2FA
Two-Factor Authentication (2FA) is essential as it adds an additional layer of security to the login process, making it more challenging for unauthorized users to gain access even if they have the password.
How to Configure:
- Email Based Two Factor Authentication: Enable this for extra security during login.
- 2FA Email Subject: Customize the subject of the 2FA email or use the default.
- 2FA Email Content: Create a custom confirmation message with variables like
%%confirm_link%%,%%user%%, etc.
Example Email Content:
Subject: 2FA Confirmation for %%user%% at %%site_title%%

Hello %%user_display_name%%,

We received a login request for your account on %%site_title%%. To confirm this login, please click on the link below:

%%confirm_link%%

Login Details:
- User: %%user%%
- IP Address: %%login_ip%%
- User Agent: %%login_ua%%
- Time: %%login_time%%

If you did not initiate this login request, please contact our support team immediately.

Thank you,
%%site_title%%
Explanation:
-
-
-
- %%confirm_link%%: This variable will be replaced with the actual confirmation link that the user must click to authenticate their login.
- %%user%%: This will be replaced with the username of the person trying to log in.
- %%user_display_name%%: This is the display name of the user, which might be a full name or a nickname.
- %%site_title%%: This will be replaced with the name or title of your website.
- %%site_url%%: This is the URL of your site and can be used if needed.
- %%login_ip%%: This will be replaced with the IP address from which the login request originated.
- %%login_ua%%: This will be replaced with the User Agent information, providing details about the browser and OS used for the login attempt.
- %%login_time%%: This will be replaced with the timestamp of the login attempt.
-
-
How to Customize the 2FA Email:
-
-
- Navigate to WP Captcha Settings: Go to your WordPress Dashboard, then to Settings, and select WP Captcha PRO.
- Find the 2FA Section: Look for the 2FA (Two-Factor Authentication) section.
- Edit 2FA Email Content: In the “2FA Email Content” field, you can paste the example email content above or write your own, using the variables provided.
- Save Changes: Click the “Save Changes” button to apply your customized email content.
-
That’s it! Now, whenever a user attempts to log in, they will receive the customized 2FA email containing the information and link necessary for confirming their login.
-
Click “Save Changes”: Confirm your selections to set up 2FA.
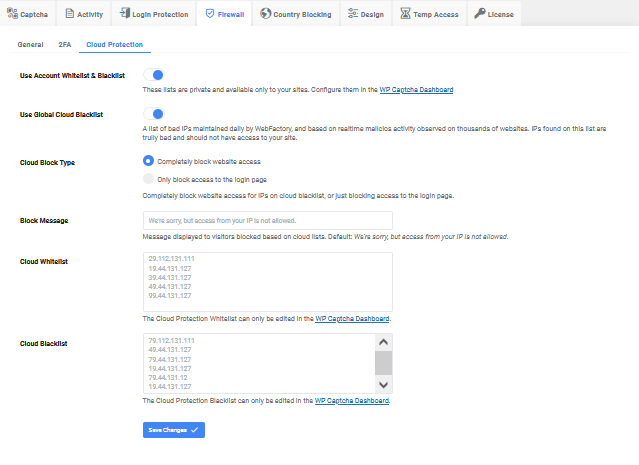
Cloud Protection
Cloud Protection offers further security by using private and global blacklists and whitelists.
How to Configure:
- Use Account Whitelist & Blacklist: Configure private lists in the WP Captcha Dashboard.
- Use Global Cloud Blacklist: Utilize a daily maintained list of malicious IPs.
- Cloud Block Type: Choose to block entire website access or just the login page.
- Block Message: Customize the message displayed to visitors blocked by cloud lists.
- Cloud Whitelist & Blacklist: View and edit these lists in the WP Captcha Dashboard.
- Click “Save Changes”: Confirm your selections to finalize the Cloud Protection settings.